Git workflow
If you’re a developer who wants to work on the Diaspora source code and submit your changes for consideration to be merged into core Diaspora* code, here’s how. Thanks to ThinkUp for their awesome developer guide, which inspired ours.
Branching model

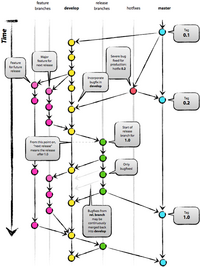
The branching scheme of our main Git repository hosted on Github is based on this article on Git branching structure by Vincent Driessen (see the image on the right for a brief overview).
In short it can be summarized as follows:
- master
- Tracks the released code, release tags are created off of it.
- develop
- This is where development happens. Pull requests should be issued against this branch.
- feature/*
- Features are worked on in their own branches, based on the develop branch.
- hotfix/*
- Hotfix branches are for fixing issues between scheduled releases. These are based on the master branch and are merged into both, develop and master.
- release/*
- These are for preparing some final steps before a release is tagged (as a normal contributor, you won't be needing to do these).
Discussion on improving this branching model happens on Discourse.
Quickfire Do’s and Don’t’s
If you’re familiar with git and GitHub, here’s the short version of what you need to know. Once you fork and clone the Diaspora code:
- Never, ever, do anything in master branch. The branch develop is the head of development, master is for stable releases!
- Don’t develop on the develop branch. Always create a feature branch specific to the issue you’re working on. Name it by issue # and description. For example, if you’re working on Issue #359, an aspect naming fix, your feature branch should be called 359-aspect-names. If you decide to work on another issue mid-stream, create a new branch for that issue–don’t work on both in one branch.
- Do not merge the upstream develop with your feature branch; rebase your branch on top of the upstream develop.
- A single feature branch should represent changes related to a single issue. If you decide to work on another issue, create another feature branch from develop.
Step-by-step (the short version)
- Fork on GitHub (click Fork button)
- Clone to computer
- $ git clone git@github.com:[you]/diaspora.git
- replace [you] with your Github username
- Don’t forget to cd into your repo:
- $ cd diaspora/
- Set up remote upstream
- $ git remote add upstream git://github.com/diaspora/diaspora.git
- $ git checkout develop
- Start working on a new issue or feature
- $ git fetch upstream
- $ git checkout -b 100-description upstream/develop
- naming convention is [issuenumber]-[description], if you don't work on an issue with a number, no worries, just skip the number.
- Develop on the feature.
- $ git add changed/file
$ git commit -m "commit message"
- $ git add changed/file
- Run the tests. Also check for violations of our styleguide with $ bin/pronto run -c upstream/develop
- Push branch to your fork on GitHub
- $ git push -f origin 100-description
- just to stop you from losing your changes in the event of data loss on your local machine
- Fetch upstream
- $ git fetch upstream
- Ensure feature branch and rebase.
- $ git checkout 100-description
$ git rebase upstream/develop
- $ git checkout 100-description
- Repeat steps 6-10 till dev is complete
- Rebase develop in to feature branch. -i allows you to clean your commits history. For smaller changes the commit message should be a simple descriptive statement of the feature or bug fix that this change represents. The commit message should not have the history of commits which were reapplied during the rebase, which is the default behavior of the git command line tool.
- $ git rebase -i upstream/develop
- Publish feature branch to Github
- $ git push -f origin 100-description
- Issue pull request for develop branch (Click Pull Request button)
Step-by-step (the long version)
If you’re new to git and GitHub, here’s the longer version of these instructions.
Install git
Create an account on GitHub and fork the Diaspora repository.

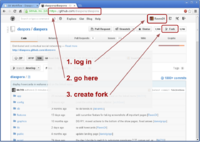
- Create a free account on GitHub, and log in.
- Go to the main Diaspora page on GitHub.
- Click the "Fork" button near the top of the screen. This will get you your own copy that you can make changes to.
Establish connectivity between your GitHub account and your development machine.

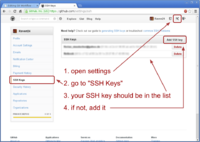
- Generate an SSH key on your development machine. Here’s a “good guide”:http://help.github.com/key-setup-redirect that gives you specific directions for whatever OS you’re accessing the page with.
- Make sure you’ve got an SSH public key on your machine and recorded in your GitHub account. You can see your SSH Public Keys on the Account Overview section of your GitHub account.
- To test the GitHub authentication run:
$ ssh git@github.com
If all is well, you should see something like this:
PTY allocation request failed on channel 0
ERROR: Hi username! You've successfully authenticated, but GitHub does not provide shell access
Connection to github.com closed.
Clone your GitHub fork to your development machine
Run a clone command against your GitHub fork. It will look something like this except that it will use your GitHub account name instead of “you”:
$ git clone git@github.com:you/diaspora.git
That downloads your copy of Diaspora to a git repository on your development machine. Change directory into the new diaspora directory and run
$ git checkout develop
Now you need to install everything you need to run it - which is quite a lot of stuff. We have some Installation guides which should help. Pop into #diaspora on IRC (Libera Chat) if you have problems.
You’ll know you’re done when you can run specs (in two stages - the cucumber features, which are selenium acceptance tests, and the rspec tests, which are unit tests) by doing this:
$ bin/rake spec
We try to make sure these always succeed. Our continuous integration server will tell you if there any current failures. If you have any test failures that you don’t see on CI, come ask in the #diaspora-dev IRC channel.
To learn more about tests in diaspora* see the Testing workflow page.
Figure out what to work on
Maybe you have a feature addition in mind, but if not, check out our issue tracker, especially the issues labeled suitable for new comers or come ask in IRC what needs doing.
Keep Your Repository Up to Date
In order to get the latest updates from the development trunk do a one-time setup to establish the main GitHub repo as a remote by entering:
$ git remote add upstream git://github.com/diaspora/diaspora.git
Verify you’ve now got “origin” and “upstream” remotes by entering:
$ git remote
You’ll see upstream listed there.
Create an Issue-Specific Feature Branch
Before you start working on a new feature or bugfix, create a new feature branch in your local repository that’s dedicated to that one change. Name it by issue number (if applicable, if there’s no issue just skip it) and description. For example, if you’re working on issue #359, a aspect naming bugfix, create a new branch called 359-aspect-names, like this:
$ git fetch upstream
$ git checkout -b 359-aspect-names upstream/develop
Write awesome code
You must write unit tests for all bug fixes, no matter how small. We can help you!
Edit and test the files on your development machine. When you’ve got something the way you want and established that it works, commit the changes to your branch on your development server’s git repo. Have a look at out testing workflow for more information.
Also check our styleguide. You can run an automatic check with: $ bin/pronto run -c upstream/develop.
When it's time to commit your code, do:
$ git add <filename>
$ git commit -m 'Issue #359: Some kind of descriptive message'
You’ll need to use git add for each file that you created or modified. There are ways to add multiple files, but we highly recommend a more deliberate approach unless you know what you’re doing.
Then, you can push your new branch to GitHub, like this (replace 359-aspect-names with your branch name):
$ git push origin 359-aspect-names
You should be able to log into your GitHub account, switch to the branch, and see that your changes have been committed. Then click the Pull button to request that your commits get merged into the Diaspora development trunk.
Rebase your development branch on the latest upstream
To keep your development branch up to date, rebase your changes on top of the current state of the upstream. Check out What’s git-rebase? below to learn more about rebasing.
If you've set up an upstream branch as detailed above, and a feature branch called 359-aspect-names, you would update upstream and rebase your branch from it like so:
git fetch upstream
# make sure all is committed (or stashed) as necessary on this branch
git rebase -i upstream/develop 359-aspect-names
You may need to resolve conflicts that occur when both a file on the development trunk and one of the files in your branch have been changed. Edit each conflicting file to resolve the differences, then continue the rebase. Each file will need to be "added" to mark the conflict as resolved:
git add <filename>
git rebase --continue
To push the updates to your GitHub repo, run: (of course, replace 359-aspect-names with your actual branch name)
git push -f origin 359-aspect-names
Send Diaspora a pull request on GitHub
Github will notify us and we’ll review your patch and either pull it in or comment on it
Helpful hint: You can always edit your last commit message by using:
$ git commit --amend
Some gotchas
Be careful not to commit any of your configuration files, logs, or throwaway test files to your GitHub repo. These files can contain information you wouldn’t want publicly viewable and they will make it impossible to merge your contributions into the main development trunk of Diaspora.
Most of these special files are listed in the .gitignore file and won’t be included in any commit, but you should carefully review the files you have modified and added before staging them and committing them to your repo. The git status command will display detailed information about any new files, modifications and staged.
$ git status
One thing you may not want to do is to issue a git commit with the -a option. This automatically stages and commits every modified file that’s not expressly defined in .gitignore, including your crawler logs.
$ git commit -a
Do not commit changes to Gemfile.lock unless you added or changed a dependency. Do not commit changes to db/schema.rb unless you added a database migration.
What’s git-rebase?
Using git-rebase helps create clean commit trees and makes keeping your code up-to-date with the current state of upstream easy. Here’s how it works.
Let’s say you’re working on Issue #212 a new plugin in your own branch and you start with something like this:
          1---2---3 #212-my-new-plugin
         /
    A---B #develop
You keep coding for a few days and then pull the latest upstream stuff and you end up like this:
          1---2---3 #212-my-new-plugin
         /
    A---B--C--D--E--F #develop
So all these new things (C,D,..F) have happened since you started. Normally you would just keep going (let’s say you’re not finished with the plugin yet) and then deal with a merge later on, which becomes a commit, which get moved upstream and ends up grafted on the tree forever.
A cleaner way to do this is to use rebase to essentially rewrite your commits as if you had started at point F instead of point B. So just do:
git rebase develop 212-my-new-plugin
git will rewrite your commits like this:
                      1---2---3 #212-my-new-plugin
                     /
    A---B--C--D--E--F #develop
It’s as if you had just started your branch. One immediate advantage you get is that you can test your branch now to see if C, D, E, or F had any impact on your code (you don’t need to wait until you’re finished with your plugin and merge to find this out). And, since you can keep doing this over and over again as you develop your plugin, at the end your merge will just be a fast-forward (in other words no merge at all).
So when you’re ready to send the new plugin upstream, you do one last rebase, test, and then merge (which is really no merge at all) and send out your pull request. Then in most cases, a reviewer has a simple fast forward on her end (or at worst a very small rebase or merge) and over time that adds up to a simpler tree.
More info on the git man page here: Git rebase: man page