Testing workflow: Difference between revisions
(Mention guard) |
(→Cucumber: added note about the environment variable) |
||
| Line 231: | Line 231: | ||
48 steps (48 passed) | 48 steps (48 passed) | ||
0m30.300s</pre> | 0m30.300s</pre> | ||
=== Selenium Webdriver and Firefox 35+ === | |||
Selenium Webdriver [https://code.google.com/p/selenium/issues/detail?id=8387 has some problems driving Firefox 35] at the moment, so [https://github.com/diaspora/diaspora/pull/5584 there is a way] to specify the firefox binary to use for testing. | |||
If the environment variable <tt>FIREFOX_BINARY_PATH</tt> is set, its must point at the firefox binary to use for testing. If it is not set, the default firefox will be used. | |||
<pre> | |||
# Example usage to set the environment variable | |||
export FIREFOX_BINARY_PATH=/opt/firefox34/firefox | |||
</pre> | |||
== Guard == | == Guard == | ||
Revision as of 20:09, 25 January 2015
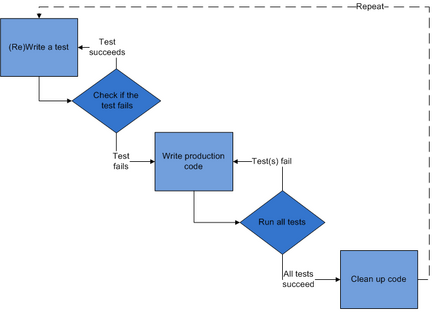
In order to assure code quality, ease refactoring and to make sure only the code that is really necessary gets written we strive to encourage TDD (Test Driven Development) or BDD (Behaviour Driven Development) when possible. There is a huge list of benefits that result from this style of development and even some research on it referenced from the Wikipedia articles, if you are interested in reading up on that topic.
In essence, TDD means that before you write some actual code, you are supposed to write a testcase firsts, using the feature or function the way it should represent itself to the outside. Of course, because no actual code has been written yet, the testcase will fail if being run. Now the idea is to write only the minimal amount of code that gets the testcase to pass and as soon as it does so, refactor the code until you are left with perfectly structured and modular code, that even passes your super-awesome testsuite.
Now, this can be done on several layers, starting at single functions, methods and classes up to what the user gets presented with in the UI. There are different tools for each one of these.
Rspec
Since Diaspora is based on Ruby on Rails, we get the rspec testing environment practically for free. Our rspec tests are located in the spec/ directory and that directory is split up in subdirectories differentiating which parts of the code are being tested with the containing files (e.g. models in spec/models/, controllers in spec/controllers/ or the Diaspora lib in spec/lib/).
Lets look at an example: If we were to test the validation and cleanup rules of the Profile model, the place to look for them is spec/models/profile_spec.rb. Inside that file you will see that the tests are written in plain ruby code structured by a DSL (Domain Specific Language), in this case a few helpful ruby methods that let us nest the tests logically and check the results more easily.
describe Profile do
  describe 'validation' do
    describe "of last_name" do
      it "strips leading and trailing whitespace" do
        profile = Factory.build(:profile, :last_name => " Ohba ")
        profile.should be_valid
        profile.last_name.should == "Ohba"
      end
    end
  end
end
This shows us that the description of the tests is supposed to be easily human-readable as this is also the part that gets shown, when the test fails ("validation" "of last_name" "strips leading and trailing whitespace"). Another thing that should catch your attention in this example is the use of a factory for creating mock objects to test with. This greatly reduces the amount of work that goes into creating somewhat realistic tests.
Before running any tests for the first time, make sure you have created the database schema for the `test` environment by doing;
RAILS_ENV="test" bin/rake db:schema:load
If you have too much time or you want to make sure you didn't break anything apart from the stuff you were working on, you can run all rspec tasks
bin/rake spec
To run just our sigle profile spec file from the example
bin/rspec spec/models/profile_spec.rb
If your test is failing, the command output will present you this
=> Building fixtures
=> Built aspect_memberships.yml, aspects.yml, contacts.yml, people.yml, profiles.yml, and users.yml
Run options: exclude {:performance=>true}

  1) Profile validation of first_name fails on purpose
     Failure/Error: false.should == true
     expected: true
     got: false (using ==)
     # ./spec/models/profile_spec.rb:11:in `block (4 levels) in <top (required)>'

  47/47:       100% |==========================================================================| Time: 00:00:00

Finished in 0.95665 seconds
47 examples, 1 failure

Failed examples:

rspec ./spec/models/profile_spec.rb:10 # Profile validation of first_name fails on purpose

Randomized with seed 28937
If all of your tests are fine, it will show you a summary and some statistics similar to the following
=> Building fixtures
=> Built aspect_memberships.yml, aspects.yml, contacts.yml, people.yml, profiles.yml, and users.yml
Run options: exclude {:performance=>true}
  46/46:       100% |==========================================================================| Time: 00:00:00

Top 10 slowest examples:
  Profile tags strips more than 5 tags
    0.14156 seconds ./spec/models/profile_spec.rb:258
  Profile validation of first_name can be 32 characters long
    0.07987 seconds ./spec/models/profile_spec.rb:16
  Profile serialization includes tags
    0.05348 seconds ./spec/models/profile_spec.rb:157
  Profile tags it should behave like it is taggable.format_tags doesn't mangle text when tags are involved
    0.05271 seconds ./spec/shared_behaviors/taggable.rb:42
  Profile tags it should behave like it is taggable.format_tags supports non-ascii characters
    0.05078 seconds ./spec/shared_behaviors/taggable.rb:27
  Profile tags it should behave like it is taggable.format_tags responds to plain_text
    0.04862 seconds ./spec/shared_behaviors/taggable.rb:38
  Profile tags it should behave like it is taggable.format_tags links each tag
    0.04851 seconds ./spec/shared_behaviors/taggable.rb:31
  Profile tags it should behave like it is taggable#build_tags builds the tags
    0.04171 seconds ./spec/shared_behaviors/taggable.rb:91
  Profile serialization includes location
    0.02894 seconds ./spec/models/profile_spec.rb:165
  Profile validation#contruct_full_name generates a full name given only first name
    0.02722 seconds ./spec/models/profile_spec.rb:56

Finished in 0.94219 seconds
46 examples, 0 failures

Randomized with seed 16731
It may be important to know to always run the rspec tests first if you are planning on using any of the other tests, because there are rspec cases that generate fixtures (hmtl/json snippets) that are needed for the other tests to work.
Jasmine
The Jasmine tests for JavaScript are located inside the spec/javascripts/ directory. They are split up in a similar manner to how the JavaScript files are structured in app/assets/javascripts/.
Jasmine tests try to resemble rspec tests in both structure and nomenclature of available helper methods, and we are using factories here, too. You can read this nice introduction if you never worked with it before to get a general idea of what it's all about and what it should be used for.
Note! Jasmine tests use some fixtures generated by the rspec tests, so if you haven't run those yet, generate the fixtures with the following command first:
bin/rake tests:generate_fixtures
The Diaspora client side code makes use of Backbone.js and the Handlebars templating system. This gives us a model/view based approach to rendering many items of the same type in the browser, while at the same time relieving the burden on the server since it doesn't have to do any significant rendering anymore. Let's take a look at a Jasmine test for the JavaScript Post model, located at spec/javascripts/app/models/post_spec.js.
describe("app.models.Post", function() {
  beforeEach(function(){
    this.post = new app.models.Post();
  })
  describe("createdAt", function() {
    it("returns the post's created_at as an integer", function() {
      var date = new Date;
      this.post.set({ created_at: +date * 1000 });

      expect(typeof this.post.createdAt()).toEqual("number");
      expect(this.post.createdAt()).toEqual(+date);
    });
  });
});
You can see, this is pretty similar to rspec, the only major difference being the JavaScript syntax. It is easy to recognize the human-readable naming of the testcase and the special functions that evaluate the outcome of the test (expect(...)).
Jasmine tests are run in the browser, since they require a JavaScript environment, although for CI (Continuous Integration) they can also run on the command line which requires virtual framebuffer as substitue for an actual screen. The webserver for Jasmine is started by
bin/rake jasmine
Which, when finished, will tell you, that it is reachable on http://localhost:8888/
your tests are here:
  http://localhost:8888/
[2012-02-22 20:43:25] INFO  WEBrick 1.3.1
[2012-02-22 20:43:25] INFO  ruby 1.9.2 (2011-07-09) [x86_64-linux]
[2012-02-22 20:43:25] INFO  WEBrick::HTTPServer#start: pid=743 port=8888
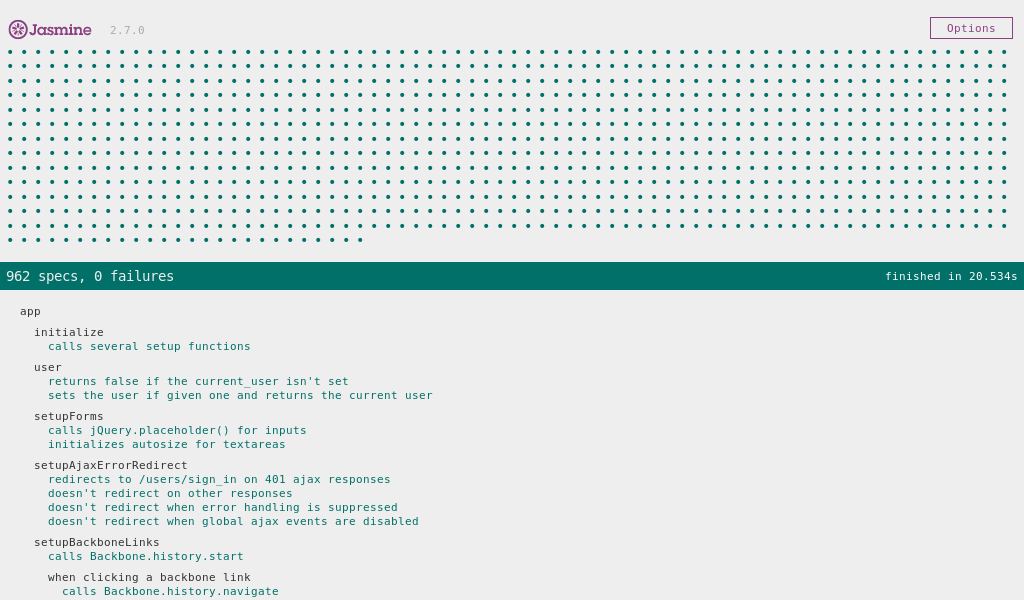
If you visit that page in your browser, and all the tests are passing, it should look like this
In case you want to show only the tests of one file you don't specify the path on the command line as it was with rspec. Instead you supply an additional parameter to the URL in your browser. E.g. http://localhost:8888/?spec=app.models.Post
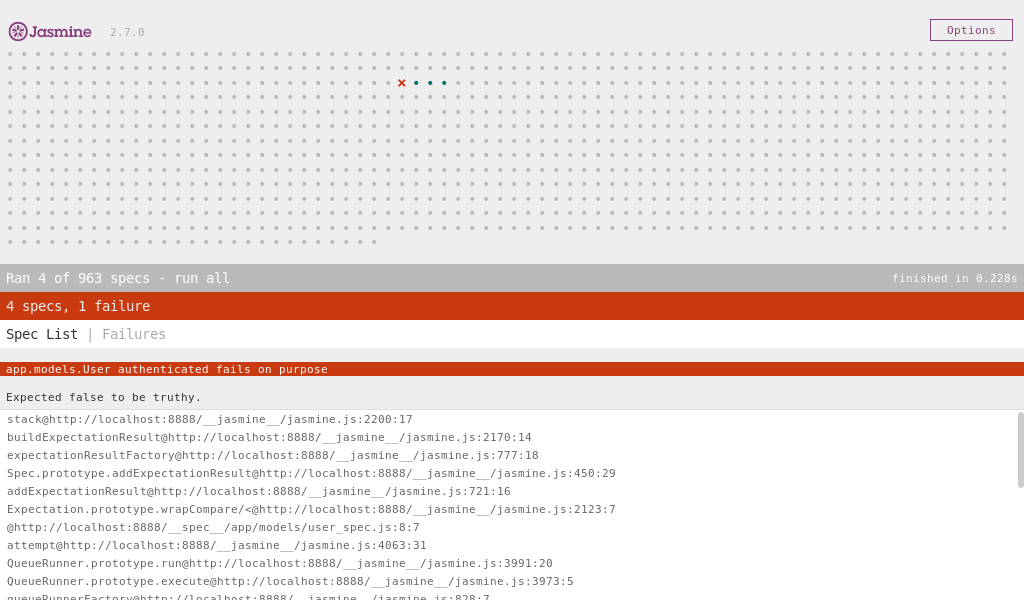
Add a failing test and you will be presented with the following
You can leave the webserver started by Jasmine running in the background while working on either your code or the test, and hit refresh in the browser to see if something changed after you are finished editing.
Cucumber
Cucumber tests or cukes are the farthest from implementaion details and actual code problems. They really just describe a behavioural aspect of the system and test that. This fact becomes very clear if you have a look at one of the files inside the features/ folder. The test cases are written in plain english in a way even the person most averse to technology in the whole world could understand them.
Lets look at the Photos feature in features/photos.feature
@javascript
Feature: photos
    In order to enlighten humanity for the good of society
    As a rock star
    I want to post pictures of a button

  Background:
      Given a user with username "bob"
      When I sign in as "bob@bob.bob"

      And I am on the home page

  Scenario: deleting a photo will delete a photo-only post if the photo was the last image
    Given I expand the publisher
    And I attach the file "spec/fixtures/button.png" to hidden element "file" within "#file-upload"
    And I wait for the ajax to finish
    And I press "Share"
    And I wait for the ajax to finish

    When I go to the photo page for "bob@bob.bob"'s latest post
    And I follow "edit_photo_toggle"
    And I preemptively confirm the alert
    And I press "Delete Photo"
    And I go to the home page

    Then I should not see any posts in my stream
Of course, all this is not something a computer program can understand on its own. That is why there needs to be a bunch of code behind that in order for it to actually work. This is done in Ruby with the help of regular expressions. E.g. in features/step_definitions/posts_steps.rb it says
Then /^I should not see an uploaded image within the photo drop zone$/ do
  all("#photodropzone img").should be_empty
end

Then /^I should not see any posts in my stream$/ do
  all(".stream_element").should be_empty
end

Given /^"([^"]*)" has a public post with text "([^"]*)"$/ do |email, text|
  user = User.find_by_email(email)
  user.post(:status_message, :text => text, :public => true, :to => user.aspects)
end

Given /^"([^"]*)" has a non public post with text "([^"]*)"$/ do |email, text|
  user = User.find_by_email(email)
  user.post(:status_message, :text => text, :public => false, :to => user.aspects)
end

When /^The user deletes their first post$/ do
  @me.posts.first.destroy
end

When /^I click on the first block button/ do
  find(".block_user").click
end
Probably the best way to start with cukes - as with every other test system - would be to copy and paste existing tests that do something similar to what you are trying to achieve and adapt them to your specific case. Cucumber has an informative wiki, that will help getting you started.
Probably the most amazing thing about cukes, if you have never seen it before, is that they run your browser on their own using the Selenium WebDriver. All you have to do, is hit return and watch (and maybe go and make yourself a cup of coffee, depening on how many steps you are running). Running all cucumber features is initiated by
bin/rake cucumber
This will take a little time to start up, but then you can watch your browser open and the terminal logging everything that is run, which takes about 7-21 minutes (depending on your machine). If you just want to run a single feature you can run
bin/cucumber features/photos.feature
This will output something similar to
Using the default profile...
...................................................

3 scenarios (3 passed)
48 steps (48 passed)
0m30.300s
Selenium Webdriver and Firefox 35+
Selenium Webdriver has some problems driving Firefox 35 at the moment, so there is a way to specify the firefox binary to use for testing. If the environment variable FIREFOX_BINARY_PATH is set, its must point at the firefox binary to use for testing. If it is not set, the default firefox will be used.
# Example usage to set the environment variable
export FIREFOX_BINARY_PATH=/opt/firefox34/firefox
Guard
You can automatically run the affected tests as you edit the files, simply let guard running in the background:
bin/guard
That's it
In case you still have questions on how to write or use tests, join us on IRC or post your problem on the mailing list.


