Integrating other social networks: Difference between revisions
(Check and refresh Facebook app creation instructions) |
m (→Twitter) |
||
| Line 15: | Line 15: | ||
** There is a Captcha ;) | ** There is a Captcha ;) | ||
** Click “Create Twitter application” | ** Click “Create Twitter application” | ||
* You now can see your | * Click the “Permissions” tab and change the “Access” to “Read and Write”. | ||
* Click the “Keys and Access Tokens” tab. You now can see your “Consumer Key” and your “Consumer Secret”, copy them to the right places in <tt>config/diaspora.yml</tt> | |||
* Restart Diaspora on your sever <br>(You can skip that if you plan to also add support for more services. Just remember to do it once you're finished with all of them.) | * Restart Diaspora on your sever <br>(You can skip that if you plan to also add support for more services. Just remember to do it once you're finished with all of them.) | ||
* You’re done. It’s now possible to post to Twitter from your pod :) | * You’re done. It’s now possible to post to Twitter from your pod :) | ||
Revision as of 11:17, 1 October 2014
General
Keys will be entered into your config/diaspora.yml
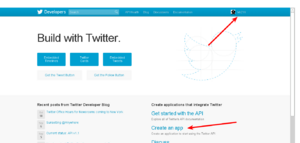
- Go to https://apps.twitter.com and sign in
- Click on ‘Create an app’
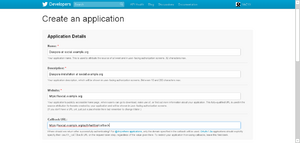
- Register your app
- Give it a name. For example "Diaspora at example.org"
- Give it a description
- Set the application website to your pod URL or a page that describes what Diaspora is and what your pod has to do with it
- Important: Set the callback URL to https://your_pod/auth/twitter/callback, replacing your_pod of course.
- There’s a ToS to accept
- There is a Captcha ;)
- Click “Create Twitter application”
- Click the “Permissions” tab and change the “Access” to “Read and Write”.
- Click the “Keys and Access Tokens” tab. You now can see your “Consumer Key” and your “Consumer Secret”, copy them to the right places in config/diaspora.yml
- Restart Diaspora on your sever
(You can skip that if you plan to also add support for more services. Just remember to do it once you're finished with all of them.) - You’re done. It’s now possible to post to Twitter from your pod :)
Tumblr
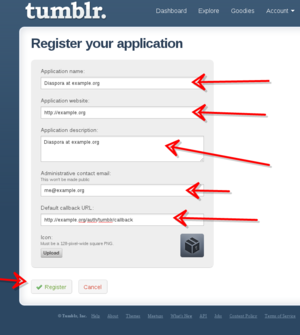
- Give it a name
- Set the application website to your pod URL or a page that describes what Diaspora is and what your pod has to do with it
- Give it a description
- Enter an email address
- Important: Set the “Default callback URL” to your pod url (including http/https)+ /auth/tumblr/callback So if your pod is located at http://example.org enter http://example.org/auth/tumblr/callback
- You can upload an icon but that’s optional
- Click register
- You’ll be redirected to the application overview where you can see your consumer key. After a click on “Show secret key” you can see your consumer secret. Paste your consumer key in the
keysetting in config/diaspora.yml and your secret key in thesecretsetting. - Restart Diaspora on your sever (you can skip that when you want to also add support for more services)
- You’re done. It’s now possible to post to Tumblr from your pod :)
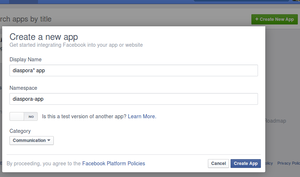
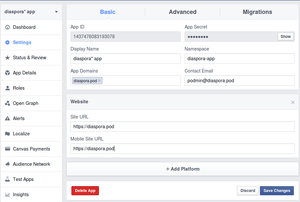
- Goto Facebook developers page and click "New application"
- Choose a name, for example “Diaspora at social.example.org”, a namespace and a category
- Fill the captcha
- Copy your App ID and your App Secret to your config/diaspora.yml
- Click 'Settings'
- Add your domain to "App Domains" and your email to the "Contact Email"
- Click "Add platform" and choose "Website", add URL to pod (same URL for mobile)
- Click "Save changes"
- Click "Status and Review" and change "Do you want to bla bla publish to general public?" to YES
- Restart Diaspora on your server
- You’re done. It’s now possible to post to Facebook from your pod
Privacy of posts to Facebook
Any posts a user makes from a pod to Facebook will be made with the privacy level that the users sets on Facebook side when the user authorizes the diaspora* pod application. Posts done from diaspora* do not follow the privacy of selected aspects on diaspora* side. This behaviour is consistent with posting to Twitter etc where the target application governs the privacy of the post.
Wordpress
- Go to the Wordpress.com Developer site and create a new application
- Add a name, a description (like "This application allows to post from the diaspora* social network to wordpress.com or any wordpress blog with jetpack enabled.") and an url.
- Set callback url to http://[your pod]/auth/wordpress/callback (tip: Wordpress doesn't let you specify a callback url beginning with localhost when you first create the app, but (for now, anyway) you can create the app with any url you want, and then edit it later to use a local url.)
- Choose the type "web"
- Edit the following lines in config/diaspora.yml:
 wordpress:
   enable: true
   client_id: 'app_client_id'
   secret: 'app_secret'
- It is now possible to cross-post to any Wordpress.com or Jetpack-enabled Wordpress.org blog.
