Integrating other social networks: Difference between revisions
(+m) |
Benhartwich (talk | contribs) (Update Facebook guide.) Tags: mobile edit mobile web edit |
||
| Line 41: | Line 41: | ||
* Goto [https://developers.facebook.com/apps/?action=create Facebook Developers] page and click "Add a New App" | * Goto [https://developers.facebook.com/apps/?action=create Facebook Developers] page and click "Add a New App" | ||
* Type a name for your App (eg. “Diaspora at social.example.org”) enter your email and click "Create New Facebook App ID" | * Type a name for your App (eg. “Diaspora at social.example.org”) enter your email and click "Create New Facebook App ID" | ||
* | * Solve the captcha. Your App has now been created. | ||
* | * You will see the screen "Add a product". Choose Facebook Login and click on setup. | ||
* | * Choose Web as plattform for using the facebook login. | ||
* | * Fill in your pod URL, e.g. https://<your pod url> and click on save. | ||
* | * On the left menu click on settings => basic. | ||
* Fill out: Display Name (= name of your Pod), App Domains (= your pod domain without any protocoll, e.g. geraspora.de), the links to privacy and tos urls. | |||
* | * At the top of this page copy the App ID and App Secret and insert these strings to your <tt>config/diaspora.yml</tt> at the right place. | ||
* | * On the left menu click on Facebook Login => settings. | ||
* | * Activate: Client OAuth Login, Web OAuth Login, Embedded Browser OAuth Login | ||
* Before going live, | * At Valid OAuth Redirect URIs place the following url: https://<your pod url>/auth/facebook/callback | ||
* Before going live, create [https://developers.facebook.com/docs/apps/test-users test user acccounts] with different permissions that do not interfere with real Facebook users to make sure that everything is set up fine | |||
* When you are ready to go, click "Status & Review" | * When you are ready to go, click "Status & Review" | ||
* In the "Do you want to make this app and all its live features available to the general public?" section, press the button to be "Yes" | * In the "Do you want to make this app and all its live features available to the general public?" section, press the button to be "Yes" | ||
| Line 61: | Line 62: | ||
By default posting from diaspora* is possible only from the app administrator's Facebook account. To allow all users on the pod to post with the Facebook integration, your app needs '''publish_actions''' permissions to be approved from Facebook as well as [https://developers.facebook.com/docs/apps/review review and approval]. | By default posting from diaspora* is possible only from the app administrator's Facebook account. To allow all users on the pod to post with the Facebook integration, your app needs '''publish_actions''' permissions to be approved from Facebook as well as [https://developers.facebook.com/docs/apps/review review and approval]. | ||
Click on App Review and start a submission. Select publish_actions from the list and fill out the questionaire. Provide the additional infos: you´ve to describe, how someone can crosspost from diaspora to facebook and you´ve to create a screencast video. For the screencast you can use [https://screencast-o-matic.com/ Screen o Matic]. Before you start the video, add a test user (at roles) and login as test user (click on edit at the created user). So it should be easy to demonstrate how the connection between diaspora and facebook works. | |||
Requirements: | Requirements for approval: | ||
* Big Logo, (1024x1024 px) | * Big Logo, (1024x1024 px) | ||
* Developer Contact Email, | * Developer Contact Email, | ||
Revision as of 20:01, 2 April 2018
General
Keys will be entered into your config/diaspora.yml
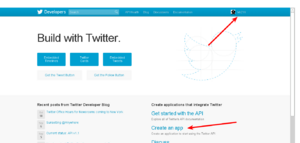
- Go to https://apps.twitter.com and sign in
- Click on ‘Create an app’
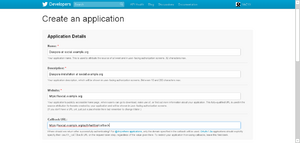
- Register your app
- Give it a name. For example "Diaspora at example.org"
- Give it a description
- Set the application website to your pod URL or a page that describes what Diaspora is and what your pod has to do with it
- Important: Set the callback URL to https://your_pod/auth/twitter/callback, replacing your_pod of course.
- There’s a ToS to accept
- There is a Captcha ;)
- Click “Create Twitter application”
- Click the “Permissions” tab and change the “Access” to “Read and Write”.
- Click the “Keys and Access Tokens” tab. You now can see your “Consumer Key” and your “Consumer Secret”, copy them to the right places in config/diaspora.yml
- Restart Diaspora on your sever
(You can skip that if you plan to also add support for more services. Just remember to do it once you're finished with all of them.) - You’re done. It’s now possible to post to Twitter from your pod :)
Tumblr
- Goto Tumblr Apps page
- Enter your Application Name (eg. “Diaspora at social.example.org”)
- Enter the Application website (eg. https://social.example.org)
- Enter the Administrative contact email address
- Important: Set the “Default callback URL” to your pod url (including http/https)+ /auth/tumblr/callback So if your pod is located at https://social.example.org enter https://social.example.org/auth/tumblr/callback
- You can upload an Icon if you wish
- Click register
- You’ll be redirected to the Application Overview where you can see your "OAuth Consumer Key". Click on “Show secret key” to reveal your Secret Key.
- Copy your OAuth Consumer Key and your Secret Key App to your config/diaspora.yml
- Restart Diaspora on your server
- You’re done. It’s now possible to post to Tumblr from your pod :)
- Goto Facebook Developers page and click "Add a New App"
- Type a name for your App (eg. “Diaspora at social.example.org”) enter your email and click "Create New Facebook App ID"
- Solve the captcha. Your App has now been created.
- You will see the screen "Add a product". Choose Facebook Login and click on setup.
- Choose Web as plattform for using the facebook login.
- Fill in your pod URL, e.g. https://<your pod url> and click on save.
- On the left menu click on settings => basic.
- Fill out: Display Name (= name of your Pod), App Domains (= your pod domain without any protocoll, e.g. geraspora.de), the links to privacy and tos urls.
- At the top of this page copy the App ID and App Secret and insert these strings to your config/diaspora.yml at the right place.
- On the left menu click on Facebook Login => settings.
- Activate: Client OAuth Login, Web OAuth Login, Embedded Browser OAuth Login
- At Valid OAuth Redirect URIs place the following url: https://<your pod url>/auth/facebook/callback
- Before going live, create test user acccounts with different permissions that do not interfere with real Facebook users to make sure that everything is set up fine
- When you are ready to go, click "Status & Review"
- In the "Do you want to make this app and all its live features available to the general public?" section, press the button to be "Yes"
- Restart Diaspora on your server
Additional information
You can always create another test application based on your live application if you need to update anything and then migrate the changes.
Application for posting to Facebook
By default posting from diaspora* is possible only from the app administrator's Facebook account. To allow all users on the pod to post with the Facebook integration, your app needs publish_actions permissions to be approved from Facebook as well as review and approval. Click on App Review and start a submission. Select publish_actions from the list and fill out the questionaire. Provide the additional infos: you´ve to describe, how someone can crosspost from diaspora to facebook and you´ve to create a screencast video. For the screencast you can use Screen o Matic. Before you start the video, add a test user (at roles) and login as test user (click on edit at the created user). So it should be easy to demonstrate how the connection between diaspora and facebook works.
Requirements for approval:
- Big Logo, (1024x1024 px)
- Developer Contact Email,
- Link to privacy policy, (https://[yourpod][dot][tld]/terms)
- a test account for Facebook. (Roles - Test Users)
- Screencast of you logging into diaspora and creating a post and showing it post to diaspora and then to your facebook test account user
Tip: Make the application as clear and simple as possible like it is being explained to a 5 year old. This will improve the odds of having your app approved. If your application does not succeed the first time they will provide you with additional information.
Once approved you can change the setting in your config/diaspora.yml to authorized:true facebook permissions and restart diaspora
Privacy of posts to Facebook
Any posts a user makes from a pod to Facebook will be made with the privacy level that the users sets on Facebook side when the user authorizes the diaspora* pod application. Posts done from diaspora* do not follow the privacy of selected aspects on diaspora* side. This behaviour is consistent with posting to Twitter etc where the target application governs the privacy of the post.
Wordpress
- Go to the Wordpress.com Developer Site and click "Create New Application"
- Add a name, a description (like "This application allows to post from the diaspora* social network to wordpress.com or any wordpress blog with jetpack enabled.") and the URL of your pod (eg. https://social.example.org)
- Important: Set the “Redirect URL” to your pod url (including http/https)+ /auth/wordpress/callback So if your pod is located at https://social.example.org enter https://social.example.org/auth/wordpress/callback
- Answer the Captcha
- Choose the type "web"
- Click on "Create"
- Visit the MyApps page and select your new App
- Copy your Client ID and your Client Secret to your config/diaspora.yml
- Restart Diaspora on your server
- You’re done. It’s now possible to post to Wordpress from your pod
Troubleshooting
When thing goes wrong, sometimes the solution is very simple. Take a look at some known issues.
Twitter and Tumblr
Server date and time
Authentication methods for Twitter and Tumblr use timestamps. If your server time and timezone are not set as expected, then the hash is generated incorrectly and it won't work.

