Integration/Chat
This wiki-page is about setting up the chat application on your Diaspora installation.
Installation/Update
1. Install Prosody like described on the page Integration/XMPP/Prosody
2. Follow the configuration guide Integration/Chat#Configuration
3. Do a regular update
Configuration
You'll find all required configuration parameters in diaspora.yml.example. If you'd like to activate the chat feature you have to copy paste the chat section from diaspora.yml.example to your actual diaspora.yml configuration file and activate the chat globally:
  chat:
    enabled: true
If you have already a working XMPP server and need only the front-end:
  chat:
    enabled: true
    server:
      enabled: false
It is also possible to configure the port and address of the BOSH service. You'll also find the required parameters in diaspora.yml.example with a small description.
Firewall Ports
If your server is behind a firewall or in a virtual environment without direct internet access (e.g. kvm/qemu). You have to open a few ports on your router (redirect ports in kvm):
- port 5269 if you want that your xmpp server can communicate with other xmpp server (this is necessary if you want to communicate with other users on different pods)
- port 5222 if you want that your user can login with different clients (e.g. #Pidgin)
UFW - Uncomplicated Firewall
(Will be shipped in the newer Ubuntu versions.)
sudo ufw allow 5269/tcp
sudo ufw allow 5222/tcp
FirewallD
FirewallD is used by RedHat/CentOS/Fedora based distributions. Open up the required ports permanently and add them to the public zone.
firewall-cmd --add-port=5222 --zone=public --permanent
firewall-cmd --add-port=5269 --zone=public --permanent
OpenWRT
Check the OpenWRT documentation here..
Iptables
Enable IP forwarding on your router:
echo "1" > /proc/sys/net/ipv4/ip_forward
or
sysctl net.ipv4.ip_forward=1
Redirect all traffic on the specified ports to xxx.xxx.xxx.xxx:
iptables -t nat -A PREROUTING -p tcp --dport 5269 -j DNAT --to-destination xxx.xxx.xxx.xxx:5269
iptables -t nat -A PREROUTING -p tcp --dport 5222 -j DNAT --to-destination xxx.xxx.xxx.xxx:5222
iptables -t nat -A POSTROUTING -j MASQUERADE
KVM/QEMU
Edit your configuration file:
virsh -c qemu:/system edit <DOMAIN>
And add at the end before the ending-tag </domain>
<qemu:commandline>
  <qemu:arg value='-redir'/>
  <qemu:arg value='tcp:5269::5269'/>
  <qemu:arg value='-redir'/>
  <qemu:arg value='tcp:5222::5222'/>
</qemu:commandline>
Finally reboot:
virsh -c qemu:/system reboot <DOMAIN>
Certificates
Put your files in the certificate-folder, you can configure the path in diaspora.yml under the chat section.
The default path is /path_to_diaspora_installation/config/certs/.
Also the domain name should be included in the file name e.g.:
- example.com.crt
- example.com.key
Prosody
If you are using the prosody configuration wrapper you still can change parameters which are not covered by the wrapper.
A requirement is that you ran the server with the enabled chat service once.
After that the wrapper will generate a prosody configuration file in
/your_diaspora_installation_path/config/prosody.cfg.lua
If you adjust it, the new configuration will be available after a restart of your diaspora server. If you don't want to restart the whole instance
you can flush the new configuration by restarting the xmpp server only:
# this will update the gem config
rails runner config/initializers/prosody.rb
# finally restart the xmpp server
eye restart xmpp
Run it
If you are finished configuring the chat server you can start Diaspora as normal:
./script/server
Log into Diaspora and you should see the web client in the right corner. You can also log into it with your favorite desktop client like Pidgin.
For that use your Diaspora ID and your Diaspora password.
Migration
Vines to Prosody
Since diaspora* 0.6.0.0 we moved from Vines to Prosody.
1. Configuration
To make this work you have to remove in your diaspora.yml every chat related configuration option except for:
  chat:
    enabled: false
    server:
      enabled: true
      certs: "config/certs"
      bosh:
        proxy: false
        address: '0.0.0.0'
        port: 5280
        bind: '/http-bind'
      log:
        info: 'log/prosody.log'
        error: 'log/prosody.err'
        debug: false
2. Certificates
Copy your certificates in /your_diaspora_installation_path/config/vines/ to the new directory /your_diaspora_installation_path/config/certs/
3. Installation
Proceed with the official integration guide: Integration/Chat#Installation.2FUpdate
Development
JSXC
Have look at JSXC_Development to how to setup a development environment!
Prosody Configuration Wrapper
Source: https://github.com/zauberstuhl/gem_diaspora-prosody-config
FAQ
JSXC is hidden, even after activating it
Firefox
Go to your http://about:config and check whether you set
media.peerconnection.enabled
to
false
Reverse it and JSXC should be displayed, again!
I have no contacts in my roster
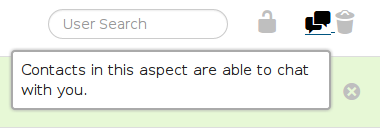
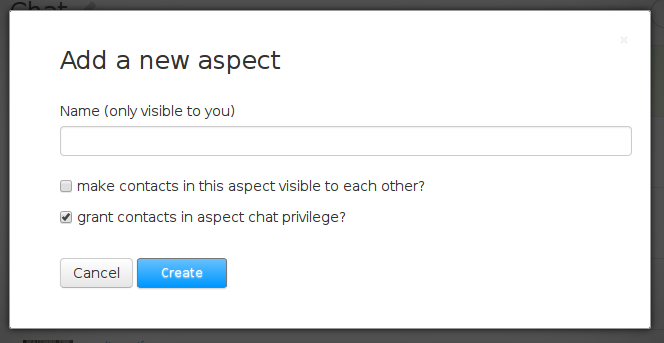
Please consider that you have to add chat privilege to your aspects!
You can toggle that privilege for every existing aspect:

Or you can do that while creating a new aspect:

(original post https://sechat.org/posts/359056)
Browser blocks mixed-content
*****************************************************************
You enabled the chat feature but haven't configured BOSH! That
could lead to mixed-content problems with the http clients. Please
think about editing your proxy configuration as described in:

diaspora.yml.example
*****************************************************************
The internal xmpp server does not support https and
even if we implement it, we would ran into certificate issues.
The problem with mixed-content is described here: https://github.com/Zauberstuhl/diaspora/issues/6
The easiest way of avoiding certificate and mixed-content issues is to use a proxy (see apache and nginx section below)!
If you finished configuring your proxy settings you also have to adjust diaspora.yml!
For my examples below, it would look like this:
  chat:
    server:
      bosh:
        proxy: true
        bind: '/http-bind'
Apache2
RewriteEngine On

RewriteCond %{REQUEST_URI} ^/http-bind
RewriteRule ^/(http\-bind.*)$ balancer://chat%{REQUEST_URI} [P,QSA,L]

RewriteCond %{DOCUMENT_ROOT}/%{REQUEST_FILENAME} !-f
RewriteRule ^/(.*)$ balancer://diaspora%{REQUEST_URI} [P,QSA,L]

<Proxy balancer://diaspora>
  BalancerMember http://127.0.0.1:3000
</Proxy>

<Proxy balancer://chat>
  BalancerMember http://0.0.0.0:5280
</Proxy>
Nginx
upstream chat_cluster {
  server localhost:5280;
}

location /http-bind {
  proxy_set_header X-Real-IP $remote_addr;
  proxy_set_header X-Forwarded-For $proxy_add_x_forwarded_for;
  proxy_set_header Host $http_host;
  proxy_set_header X-Forwarded-Proto https;

  proxy_redirect off;
  proxy_connect_timeout 5;
  proxy_buffering       off;

  proxy_read_timeout    70;
  keepalive_timeout     70;
  send_timeout          70;

  client_max_body_size 4M;
  client_body_buffer_size 128K;

  proxy_pass http://chat_cluster;
}
Debugging
On default Vines will log to log/prosody.log and has a log level of info set. Un-comment in your diapsora.yml error: 'log/prosody.err to set the log level to debug-mode. The debug level logs all XML sent and received by the server.
  chat:
    server:
      log:
        info: 'log/prosody.log'
        error: 'log/prosody.err'
        debug: false